
Adding a nominee to your Demat account is indeed mandatory and it is an important step to secure your investments. Adding a nominee is a quick and simple process and it ensures that your investments are secure in case of any unforeseen circumstances. Don’t forget to add a nominee to your Demat account before the deadline of September 30, 2023 to avoid any inconvenience. It can be done online through most major brokers such as Zerodha, Upstox, Angel One, Groww and 5paisa .
Here’s a step-by-step guide on how to add a nominee to your Zerodha account
- Login to your Zerodha account on console.zerodha.com.
- Click on the ‘Account’ tab, and then select ‘Nominee’ from the dropdown menu.
- Click on the ‘Add Nominee’ button.
- Enter the nominee details such as name, relationship with you, date of birth, and contact information.
- Upload a scanned copy of the nominee’s ID proof, such as Aadhaar card, PAN card, Passport, Voter ID card, or Driver’s License.
- Specify how your holdings and funds will be distributed among the nominees (in case you have added more than one nominee).
- Click on ‘Continue’.
- Proceed to e-sign and click on ‘Sign Now’.
- Accept the terms and conditions, enter the Aadhaar number of the account holder and click on ‘Send OTP’.
- Enter the OTP received on your Aadhaar-registered mobile number and click on ‘Verify OTP’.
Here’s a step-by-step guide on how to add a nominee to your Upstox account:
- Log in to your Upstox account on account.upstox.com.
- Click on the ‘Nominee’ tab, and then select ‘Add Nominee’.
- Enter the nominee details such as name, relationship with you, date of birth, and contact information.
- Upload a scanned copy of the nominee’s ID proof, such as Aadhaar card, PAN card, Passport, Voter ID card, or Driver’s License.
- Specify how your holdings and funds will be distributed among the nominees (in case you have added more than one nominee).
- Click on ‘Proceed for E-Sign’.
- Enter your Aadhaar number and click on ‘Send OTP’.
- Enter the OTP received on the mobile number linked with Aadhaar and click on ‘Submit’.
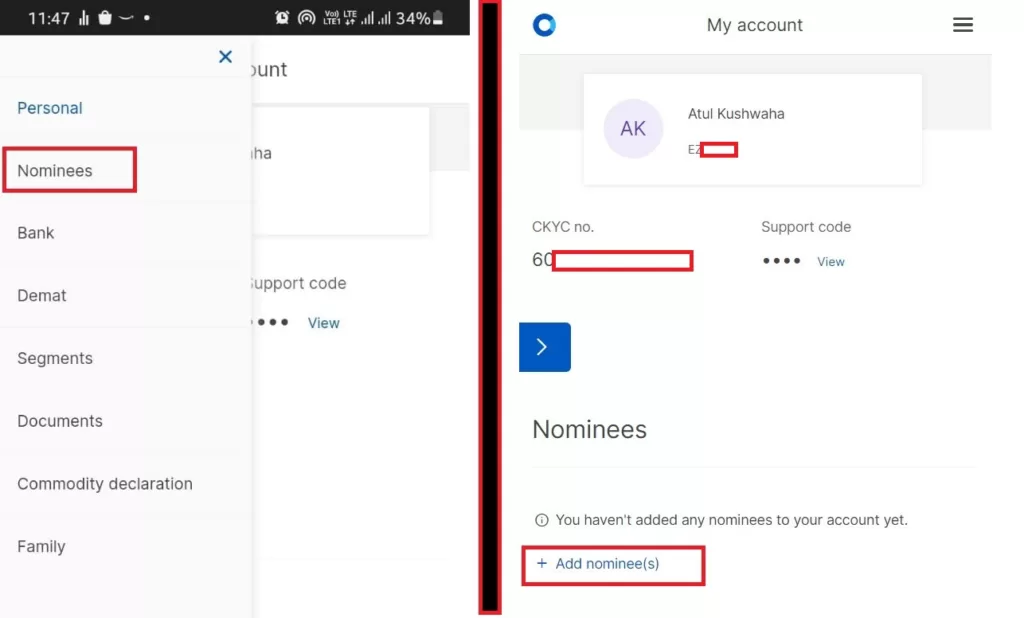
Here’s a step-by-step guide on how to add a nominee to your Angel One account:
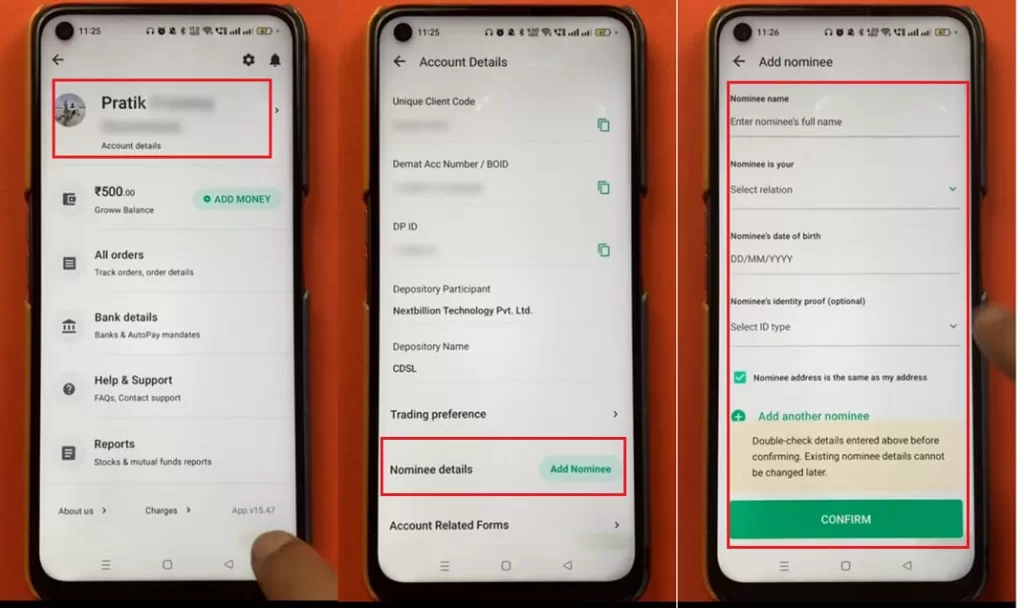
- Log in to your Angel One account on their web platform.
- Click on your Client ID on the right-hand side of the page to reveal a dropdown menu. From the dropdown menu, select “My Profile”.
- Select the “Add Nominee” option.
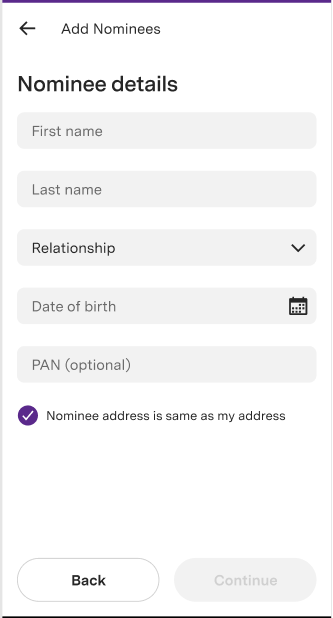
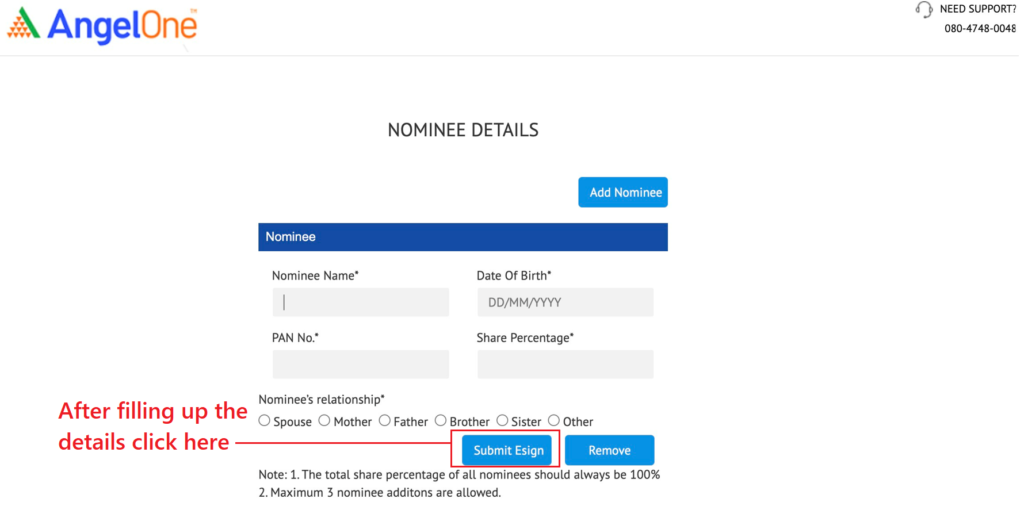
- Enter the nominee details such as name, date of birth, relationship with you, PAN card details, and allocation percentage.
- Click on ‘Proceed for E-Sign’.
- Enter your Aadhaar number and click on ‘Send OTP’.
- Enter the OTP received on your Aadhaar-registered mobile number and click on ‘Verify OTP’.
Here’s a step-by-step guide on how to add a nominee to your Groww account:
- Log in to your Groww account on their web platform.
- Click on the ‘Add Nominee’ button.
- Enter the nominee’s details such as name, relationship with you, date of birth, and contact information.
- Upload a scanned copy of the nominee’s ID proof, such as Aadhaar card, PAN card, Passport, Voter ID card, or Driver’s License.
- Specify how your holdings and funds will be distributed among the nominees (in case you have added more than one nominee).
- Click on ‘Finish with Aadhar E-Sign’.
- Enter your Aadhaar number and click on ‘Send OTP’.
- Enter the OTP received on the mobile number linked with Aadhaar and click on ‘Verify OTP’.
Here’s a step-by-step guide on how to add a nominee to your 5paisa account:
- Log in to your 5paisa account on their web platform or mobile app.
- Click on your profile icon and select the “My Account” option.
- Select the “Nominee Details” option from the menu on the left-hand side of the screen.
- Click on the “Add Nominee” button.
- Enter the nominee’s details such as name, relationship with you, date of birth, and contact information.
- Upload a scanned copy of the nominee’s ID proof, such as Aadhaar card, PAN card, Passport, Voter ID card, or Driver’s License.
- Specify how your holdings and funds will be distributed among the nominees (in case you have added more than one nominee).
- Click on ‘Proceed for E-Sign’.
- Enter your Aadhaar number and click on ‘Send OTP’.
- Enter the OTP received on the mobile number linked with Aadhaar and click on ‘Verify OTP’.
Disclaimer: The information provided in this Blog is for educational purposes only and should not be construed as financial advice. Trading in the stock market involves a significant level of risk and can result in both profits and losses. Spider Software & Team does not guarantee any specific outcome or profit from the use of the information provided in this Blog. It is the sole responsibility of the viewer to evaluate their own financial situation and to make their own decisions regarding any investments or trading strategies based on their individual financial goals, risk tolerance, and investment objectives. Spider Software & Team shall not be liable for any loss or damage, including without limitation any indirect, special, incidental or consequential loss or damage, arising from or in connection with the use of this blog or any information contained herein. ![]()


Thank for your blog its really helpfull